Tuesday, October 13, 2015

Adding Glamour with Picture Frame Gilding

gilding process gold leaf picture frame
A gilded picture frame, prior to finishing
If you like your artwork bordered by classy, glossy gold, a gilded frame might be the perfect choice.

Gilding is the process used to apply gold leaf (or sometimes silver leaf) to a surface.  This surface can be a three dimensional sculpture, a ceiling moulding, a small object like a door handle, a picture frame, or any number of other items.

In the case of picture frames, this age old decorative style is most commonly used on detailed, ornately carved or sculpted frames, though it can look just as striking on a plain flat or curved face (and is simpler to apply).

There are two main gilding methods: water gilding and oil gilding.  Both have many similarities, but a few differences as well that make each more suited to different skill levels and products.

Oil Gilding
faux imitation gold leaf booklet
A book of imitation gold leaf

Oil gilding is the method most suitable for beginners.  It gets its name from the oil-based coating applied prior to the gold leaf.  Essentially, any object that can be painted can be oil gilded, and items prepared in this way are more durable in outdoor environs.

There are only a few steps involved in oil gilded. Once the object has been primed (technically an optional step, though the base colour will affect the final appearance of the gold), a layer of oil-based "gilding size" is brushed on.  The gold leaf is simply laid on top and left to dry.

Water Gilding

Water gilding is the more complicated method of the two.  Though the process has changed a little, at its bones it is the same method used by the ancient Egyptians.

The process got its name from the water that is mixed with other mediums during the numerous steps.  Water is combined with animal-skin glue and clay powder in various quantities.  Water gilded objects can be burnished (rubbed to produce a high shine), unlike oil gilded items.

DIY Gilding
framed mirror circular gilded
A great DIY Gilding How-To

For the crafty among us, gilding is absolutely a project that can be undertaken at home.  There are plenty of ways to transform this complicated process into one that can be accomplished in a few hours at the kitchen table.
  • Imitation gold leaf is much cheaper than real gold and produces much the same effect.
  • In the spirit of saving money, any pieces of leaf that don't adhere in the first layer can be used to cover up missed spots.
  • Traditionally, the various coatings are mixed by hand, but today they can be purchased from a good craft store, pre-mixed and ready to use.
  • Though not completely authentic, a clear varnish can be used over the dried, gilded frame to make it really last!
For more information on this fun treatment, check out our complete article: Gilding Picture Frames.

KeenART Media wide selection of gold and silver picture framesWhile you're there, why not take a look at our selection of beautiful gold picture frame mouldings and striking classic silver frames.  We have options for every budget and decor style.

We'd love to hear from you! Have you ever gilded a picture frame or used some other method to create a stunning gold or silver decor piece?  Tell us about your experience in the comments section!

Tuesday, September 29, 2015

How to Clean Your Picture Frame

Few people enjoy cleaning house, but even those who make it a weekly chore tend to forget some nook or cranny.

One popular oversight is the wall hangings around the home. But failing to clean a picture frame can result in seriously stuck-on dirt, thick grime, and eventually, even irreparable damage to the frame. It's a good idea to add dusting the frames to your weekly to-do list.

Even so, you might find certain frames need a bit more TLC. Frames hanging in the kitchen, for instance, can develop a build up of grease from cooking within just a few days!

Let's break it down.

Cleaning the Frame

If your frames require more than simple dusting, the next step is to wipe them down with a damp cloth.

Always take your picture frame off the wall, first. Even the gentle pressure exerted on the top of the frame to wipe it will put unnecessary stress on hanging hardware and wire.

If just water still doesn't cut it, a spray dust cleaner can be used, as long as the wood is varnished or painted (ie: not raw wood!). Always spray onto the cloth, not onto the frame. The spray can soak quickly into the wood, leaving a discoloration.

If your frame has ornate carvings or designs, you may need a cotton swab or toothbrush to scrub the dust and dirt out of those tiny areas.

(If your frame is made from metal rather than wood, you can add a bit of dish soap to the water. You may want to test this on a non-visible section just to be sure.)

Cleaning the Glazing

Dirt, dust, and the occasional fingerprint will likely need to be cleaned off the glass or plexiglass covering your image.

If the glazing is glass, you can use a soft cloth and window cleaner to wipe the surface. Again, never spray directly on the glass – the cleaner can drip down between the frame and the glazing and damage the print behind.

If your frame uses plexiglass, do not use window cleaner – it can eat away at the material. Instead, dampen a soft cloth with water, and add a bit of dish soap if needed.

For information for disassembling your frame for a deep cleaning, see our full article: “Caring For Your Picture Frame

Before Framing

Keeping your frame clean is important, but a frame can usually be replaced. It's the images inside that often have more sentimental value.

Make sure your photographs and artwork stay beautiful along with your frame by investing in UV-filtering glass or plexiglass. Before you frame them, and when cleaning the frame, be sure to set the photos far away from any water or cleaners so they don't get splashed. And always ensure the glazing is completely dry before re-assembling a frame – otherwise humidity can cause moisture build up on the inside of the glazing, which can make the images stick or develop mold.

For more information on caring for your special photos, check out our article on “Conservation Framing”.


How do you keep your wall art in tip top shape?

Any cleaning tricks you're willing to share with the community?

As always, don't hesitate to contact us if you have questions about any of our products or services. Our knowledgeable staff are always happy to help!

Friday, September 11, 2015

Artist Spotlight: Photographer Don Pettit

Photographer Don Pettit got his start through science. Though his father's landscape painting instilled a love of nature and composition from a young age, it was in his high school darkroom that Pettit began to apply this ingrained appreciation. A kindly physics teacher taught him and his friends how to shoot and develop black-and-white film, and this chemistry kick-start was the beginning of the end for Pettit – he was hooked.

After high school, he got a job as assistant to a commercial photographer in Toronto, and eventually began working freelance. Through years of self-guided study, experience, and experiments of which his high school physics teacher would no doubt be proud, Pettit built his career doing what he loved: photographing nature.


Image owned and provided by D. Pettit

After those initial sessions with his former teacher, Pettit found inspiration in the work of photographers like Ansel Adams (1902-1984) whose work pushed Pettit to explore the Zone System of ideal film exposure and development on the journey to perfect his darkroom-developed images.

The darkroom experience of watching those sheets of blank paper become gradient-rich black and white images was a big part of his life and job, but digital elbowed its way in, eventually. Though Pettit is a faithful digital convert today – he enjoys a Canon 5D Mark II camera with a shallow depth of field, zoom lens, and has begun dabbling in HDR - he still misses that unique interaction with contact sheets, chemical beakers, and enlargers.

Over the years, Pettit has taken it upon himself to embrace and disperse nature's beauty for the enjoyment of every person. Driven by that concern many of us share, about the future of the natural world, he strives with every image to awaken a sense of awareness and an urge to protect and preserve our non-urban habitats before they are edged out by encroaching cityscapes.

Image owned and provided by D. Pettit
These days, Pettit snaps and shoots primarily in Northeastern British Columbia, where he captures the diversity of the region, from its craggy Rocky Mountains to the grassy prairies just over the Alberta border, topped here by crystal blue skies, and there by the awe-inspiring Aurora Borealis. Sightings of moose, bear, deer and other wildlife make each season its own brilliant array of colour and life. “You must totally leave your regular world, for at least a few hours, to discover a new one,” he says.

In addition to his own, personal projects, Pettit spends his time creating large-scale canvas prints for local interior design clients. He continues to be inspired by the greats gone before; he advises aspiring photographers to explore the work and words of the established artists they respect. That, in combination with some basic photography classes, a solid grasp of manual camera settings, and a good tripod, is a surefire way to get started on the path of photographic happiness and success.

Image owned and provided by D. Pettit

To Pettit, any time is a good time to capture a beautiful, bucolic scene, be it midday, midnight, or that elusive Golden Hour just after the sun rises and just before it sets. He encourages fellow nature photographers to get lost in the moment when shooting outdoors. His recommendation: “Consider nature photography to be a visual meditation that breaks through the mind set of human civilization and allows you to sink into and communicate with the immediate and present natural world.” If you get out of the bustle of urban life, just be still and watch, “you will be amazed at what you see and find to photograph.”

Image owned and provided by D. Pettit


Interested in hanging some of Don Pettit's work on your own walls? Get in touch by calling 250-782-6068, or shooting (pun intended) him an email: dpettit@pris.ca.


Saturday, February 21, 2015

Floater Frames & Canvas Floaters

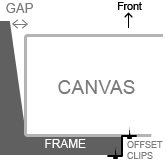
The floating effect is achieved with three styles of floater frames: Stair step, L-shaped, and Tapered frames. There is a space between the edge of the floater frame and the edge of your canvas, that gives it the "floating" effect. The frame is attached to the back of your canvas so no nails or screws will be visible and you do not need glass or a backing to hold it in place. These frames are perfect for various depths of canvases so you do not need to worry about finding the right one for yours!


Stair Step
This type of floater frame has a small "step" inside that provides a uniform amount of space between your canvas and the edge of the frame. No guess work is needed for these frames, just simply mount your canvas inside and you are finished!


Tapered
 This type of frame tapers at the front to leave a uniform amount of space around your canvas. This frame is very minimalistic since you won't see a step between the frame and canvas.


L Shape 
 To achieve the floating effect, we add 1/2" to your artwork's dimensions so that there will be a 1/4" space all around your artwork. Mounting your canvas into this frame takes a bit more time since you have to make sure the space is even all the way around.


To read more more about canvas floaters and mounting your canvas Click here
To order Canvas Floaters online Click here